Understanding Box Joints for Strong, Attractive Corners
Box joints are one of the most visually appealing and structurally sound joinery methods used in woodworking. Simple yet versatile, these joints involve interlocking “fingers” or “tabs” cut into the ends of two pieces of wood that fit together to form a tight, seamless corner. Whether for furniture, storage boxes, or other woodworking projects, box joints provide the strength and beauty woodworkers often seek in their work.
This article will break down the essentials of box joints, their advantages, and practical steps for creating them to give beginners and seasoned woodworkers alike a comprehensive understanding of how to use this technique effectively.
What Are Box Joints?
Box joints, also known as finger joints, consist of alternating projections (fingers) and recesses cut into the ends of two pieces of wood. When these fingers interlock, they create a strong, squared corner ideal for boxes, drawers, and similar projects.
Unlike dovetail joints, which have a wedge-shaped design, box joints use straight fingers, making them a great option for both beginners and experienced woodworkers.
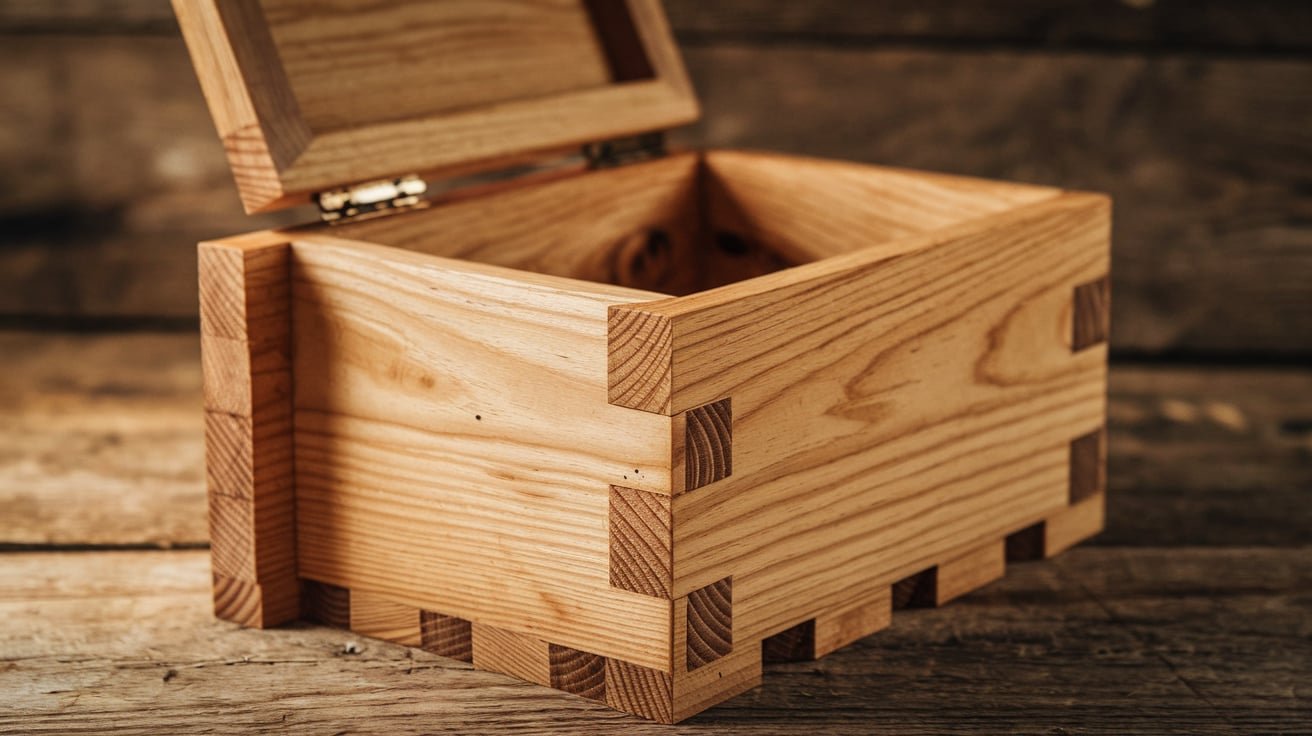
Box joints are valued for their visual impact and strength, allowing the wood grain of the jointed pieces to show in a pattern that becomes a design element on its own.
They are often used in projects where durability is essential, as the interlocking fingers offer significant structural integrity.
Advantages of Box Joints
Box joints offer several distinct benefits that make them a popular choice for woodworking projects:
- Strength and Durability: The interlocking fingers increase the surface area of the joint, distributing stress evenly and providing strength without the need for additional fasteners.
- Aesthetic Appeal: The repeating pattern created by the fingers adds a decorative element to corners, showcasing the grain and providing an appealing design feature.
- Versatility: Box joints work well with many types of wood and can be adapted to projects of various sizes, making them ideal for everything from small boxes to larger furniture pieces.
- Ease of Creation: Compared to dovetail joints, box joints are generally easier to cut and align, making them accessible for woodworkers at all skill levels.
Tools Needed for Making Box Joints
Crafting box joints requires a few essential tools, some of which may already be in your woodworking toolkit. Here’s a list of what you’ll need to get started:
- Table Saw with Dado Blade (or Router with a Jig): A table saw equipped with a dado blade can cut multiple fingers in one pass, speeding up the process. A router with a box joint jig can also be used for high precision.
- Miter Gauge or Crosscut Sled: To achieve clean, square cuts on the table saw, a miter gauge or crosscut sled is essential for accuracy.
- Marking Gauge or Ruler: Accurate measurements and markings are essential for creating well-aligned joints, so a marking gauge or ruler is a must.
- Wood Glue: Box joints typically rely on glue rather than fasteners, so a quality wood glue is essential for securing the joint.
- Clamps: Once glued, clamps help ensure the joint stays tight and aligned as it dries, contributing to a strong, lasting bond.
Steps to Create Box Joints
Step 1: Determine Finger Size and Layout
Before cutting, decide on the width of each finger. The size of the fingers is typically half the thickness of the wood, though this can vary based on the project and desired look. Smaller fingers create a finer pattern, while larger fingers provide a more pronounced appearance.
Step 2: Set Up the Dado Blade or Box Joint Jig
If using a table saw, set up a dado blade to the width of each finger. Alternatively, if you’re using a router, a box joint jig can guide your cuts precisely. Ensure the height of the blade matches the thickness of the wood to produce a clean, square cut.
Step 3: Mark Your Cuts
Using a marking gauge or ruler, mark where each finger and recess will be cut along the edge of the wood. Take time to ensure accuracy, as this will help avoid uneven fingers or gaps.
Step 4: Cut the First Piece
On the first piece, make the initial cut for the first finger, then shift the wood and cut each subsequent finger in sequence. Repeat this process along the entire edge of the board, making sure each cut is even and aligned.
Step 5: Align and Cut the Second Piece
Once the first piece is complete, use it as a guide to mark the fingers on the second piece. This ensures that the two pieces will fit together precisely. Then, repeat the cutting process on the second piece.
Step 6: Test Fit and Make Adjustments
Before gluing, test-fit the two pieces. They should interlock tightly without force; any minor adjustments can be made using a chisel to trim excess wood.
Step 7: Glue and Clamp
Apply a thin layer of wood glue to the fingers and interlock the pieces. Use clamps to hold the joint together while it dries, ensuring the wood does not shift. Allow the glue to cure fully before handling the joint.
Step 8: Sand and Finish
Once the glue has dried, sand the joint lightly to remove any excess glue and smooth the edges. If desired, apply a finish to bring out the wood grain and add protection.
Tips for Perfecting Box Joints
Creating box joints with precision can be a rewarding experience with the following tips in mind:
- Consistent Measurements: Consistent finger width and spacing are essential. Even slight variations can lead to gaps, weakening the joint and compromising its appearance.
- Sharp Blades: A sharp dado blade or router bit produces cleaner cuts, reducing the need for sanding and trimming afterward.
- Test Cuts: Before working on your actual project pieces, practice on scrap wood to ensure your setup and measurements are correct.
- Avoid Excessive Glue: Too much glue can seep out and complicate cleanup. A thin, even layer will provide adequate bonding without excess.
Project Ideas for Box Joints
Box joints lend themselves to a range of practical and decorative projects. Here are a few ideas to try once you’ve mastered the basics:
- Storage Boxes: A classic project, storage boxes showcase the beauty of box joints and allow for customization in size, wood choice, and finish.
- Drawer Construction: Box joints offer the strength needed for drawers, making them a great choice for furniture projects.
- Tool Caddies: A box jointed tool caddy not only looks good but also provides durable, long-lasting storage for hand tools.
- Decorative Frames: Box joints can be used to create sturdy, eye-catching frames for artwork, photos, or mirrors.
Box Joints vs. Other Joinery Methods
While box joints are highly functional and attractive, it’s helpful to understand how they compare to other popular joinery techniques:
- Box Joints vs. Dovetail Joints: Dovetail joints are known for their wedge-shaped fingers, which provide additional pull resistance. However, box joints are easier to create, especially with a jig, and offer a similar visual effect.
- Box Joints vs. Rabbet Joints: Rabbet joints involve a groove cut into one piece, allowing another piece to sit flush against it. While rabbet joints are simpler to make, box joints provide more surface area and thus greater strength.
- Box Joints vs. Half-Lap Joints: Half-lap joints involve removing half the thickness of each board where they intersect. Box joints, in contrast, offer a decorative element and greater bonding area.
Troubleshooting Common Issues
If you encounter issues with box joints, the following troubleshooting tips can help:
- Gaps Between Fingers: Gaps can occur if measurements are off or if cuts are uneven. Check measurements carefully and ensure consistent blade height.
- Tight Fit: If the joint is too tight to assemble easily, use a chisel to trim down the fingers slightly.
- Misalignment: If pieces don’t align perfectly, ensure that both pieces were cut accurately and square. Adjust your jig or blade as needed for future cuts.
Box joints offer a balance of beauty, strength, and practicality, making them an excellent choice for projects that require durable, eye-catching corners.
For beginners, mastering box joints can open up new creative possibilities, while seasoned woodworkers can appreciate their versatility and aesthetic potential.
Whether used for boxes, furniture, or decorative items, box joints add a classic touch that is both functional and visually appealing, ensuring they remain a timeless feature in woodworking.
With practice, attention to detail, and the right tools, anyone can achieve clean, precise box joints that showcase the natural beauty and strength of wood.

