A Beginner’s Guide to Japanese Joinery Techniques
Japanese joinery is an age-old woodworking technique that uses intricate, precise methods to interlock wood pieces without the need for nails, screws, or fasteners. This technique is an art form, combining functionality with elegance and strength. For beginners, understanding Japanese joinery provides a foundation not only in technique but also in patience, precision, and appreciation for fine craftsmanship. This guide explores the essential aspects of Japanese joinery, from its history to tools, techniques, and common types, to help newcomers delve into this fascinating world of woodworking.
1. Historical Overview of Japanese Joinery
Japanese joinery has roots that stretch back over 1,000 years, shaped by architectural needs, craftsmanship, and the availability of timber in Japan. Traditional Japanese structures, such as temples, shrines, and pagodas, are still standing today, showcasing the durability of these techniques. Japan’s rich forestry resources inspired artisans to maximize the use of timber in sustainable, innovative ways, resulting in unique joinery that requires high skill and deep knowledge of wood behavior.
In the past, Japanese carpenters worked mainly with indigenous woods like hinoki (Japanese cypress), sugi (Japanese cedar), and keyaki (Japanese elm). The focus was on using each piece of wood effectively while avoiding waste. As a result, Japanese joinery became an integral part of architectural and furniture construction, evolving with distinct regional styles. Japanese joinery has recently gained international attention for its complexity, elegance, and strength, capturing the interest of woodworking enthusiasts worldwide.

2. Key Principles Behind Japanese Joinery
Japanese joinery relies on several principles that set it apart from other woodworking methods:
- Precision and Patience: Every cut, notch, and mortise must be precisely measured and executed. There is little room for error, as these joints rely on exact fitting.
- Simplicity and Elegance: Japanese joinery emphasizes the natural beauty of the wood, showcasing grain patterns and textures.
- Strength Without Fasteners: The interlocking nature of the joints creates structural integrity, making them strong enough for construction purposes.
- Harmony with Wood Properties: The craftsman must understand how different wood types behave, anticipating expansion, contraction, and movement over time.
3. Essential Tools for Japanese Joinery
Mastering Japanese joinery begins with familiarizing yourself with traditional Japanese woodworking tools, many of which are distinct from their Western counterparts. Investing in these tools allows beginners to experience the traditional methods used by Japanese artisans.
- Japanese Saws (Nokogiri): Unlike Western saws that cut on the push stroke, Japanese saws cut on the pull stroke. This technique allows for a thinner, more precise cut. Key saws include the Ryoba (dual-edge saw for crosscut and rip cuts), Dozuki (fine-tooth saw for delicate work), and Kataba (single-edged saw for deeper cuts).
- Japanese Chisels (Nomi): Japanese chisels are shorter and thicker than Western chisels, making them ideal for precise work. Mortising chisels (Ari Nomi) and paring chisels (Usu Nomi) are especially useful for joinery.
- Japanese Planes (Kanna): Like saws, Japanese planes work on the pull stroke. They produce fine shavings, creating smooth, even surfaces and refining joint faces.
- Mallets (Genno): Japanese mallets are designed for fine-tuning joints. Made from wood, they offer a soft yet firm impact that protects both the tool and the wood.
- Marking Gauges (Sumi-tsubo and Kebiki): Marking gauges help woodworkers draw precise lines and guides. Sumi-tsubo is used for ink marking, while Kebiki is a marking gauge used to draw parallel lines along the grain.
4. Japanese Joinery Techniques and Joint Types
Japanese joinery techniques feature several types of joints, each crafted for specific structural needs. Each joint can be complex, and it often takes practice to achieve the necessary level of precision.
4.1 Mortise and Tenon (Hozo)
The mortise and tenon joint, known as hozo in Japanese, is one of the most fundamental woodworking joints, used globally but perfected in Japanese joinery. It involves a rectangular hole (mortise) and a corresponding projection (tenon) that fits into it.
- Application: Used for attaching table legs, beams, and columns.
- Variations: Japanese joinery features several mortise and tenon variations, including through tenons, hidden tenons, and wedged tenons for added stability.
The precision in crafting this joint is essential, as a loose fit compromises the joint’s stability. Beginners can start with basic mortise and tenon joints, gradually moving to more complex variations.
4.2 Dovetail Joint (Aikake-tsugi)
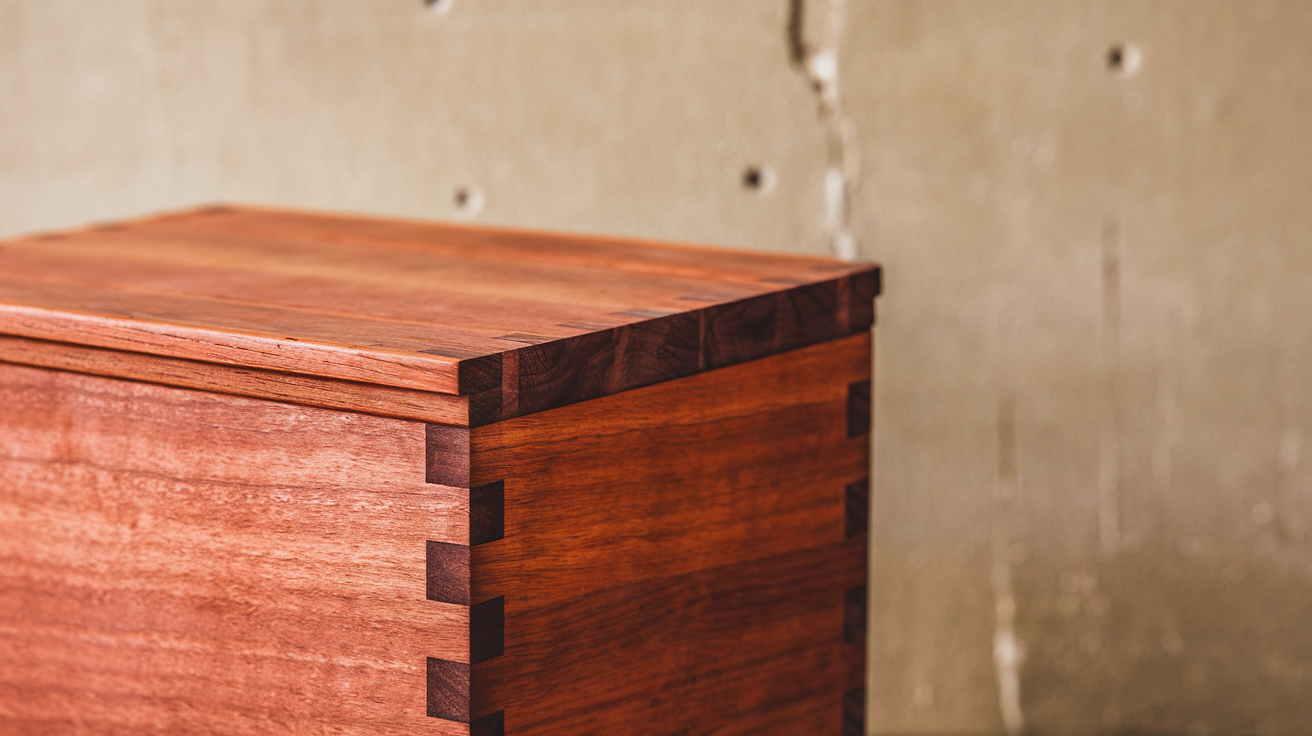
Dovetail joints, known as aikake-tsugi, are recognized for their distinctive “tail” shape. This joint is celebrated for its strength, resisting pulling forces without additional fasteners.
- Application: Ideal for box and drawer construction.
- Variations: Variants include the half-blind dovetail, where only one side shows the dovetail pattern, and the through dovetail, which is visible on both sides.
Japanese dovetail joints are tighter and more precise than Western dovetails, often crafted by hand for accuracy. They are visually appealing and structurally reliable.
4.3 Scarf Joint (Katsugi-shikuchi)
The scarf joint, or katsugi-shikuchi, is designed to join two pieces of wood end-to-end. It’s often used for creating long beams and in situations where wood length is a limitation.
- Application: Common in construction and long furniture pieces.
- Types: Variations include the “hooked” scarf joint, which adds more locking capability, and the “stopped” scarf joint, which provides a clean, seamless look on the exterior.
Creating a tight scarf joint requires accurate cuts and careful alignment, especially for longer beams that need to carry weight without bending.
4.4 Half-Lap Joint (Aigaki)
A simple yet essential technique, the half-lap joint involves removing half the thickness of two pieces of wood at the joining point so they interlock flush.
- Application: Widely used in frames, dividers, and lattice work.
- Types: Japanese joinery includes variations like the cross lap and mitered lap, each with different structural and aesthetic purposes.
While simpler to master than other Japanese joints, the half-lap joint still requires precision, as slight misalignments can weaken the structure.
4.5 Kanawa Tsugi (Lapped Mortise and Tenon)
The kanawa tsugi is a sophisticated lapped mortise and tenon joint that interlocks both horizontally and vertically. It’s particularly strong and well-suited for high-stress areas.
- Application: Often found in architectural frameworks and heavy furniture.
- Complexity: This joint involves careful planning and exact cuts. Beginners may find it challenging but rewarding.
Kanawa Tsugi exemplifies the combination of form and function in Japanese joinery, offering strength without visible fasteners.
4.6 Finger Joint (Tehama-shikuchi)
Finger joints, also called tehama-shikuchi, consist of interlocking “fingers” cut into the ends of two pieces. These joints are used for joining shorter boards to form a longer, continuous piece.
- Application: Often used for drawer sides, box construction, and long boards.
- Advantages: Strong and decorative, finger joints add an element of artistry to the structure.
Creating even, tight-fitting fingers requires practice, but this joint provides both strength and an aesthetically pleasing pattern.
5. Step-by-Step Guide for a Basic Japanese Joinery Project
For beginners, tackling a small project such as a box or frame is a practical way to start. Here’s a simple plan for creating a small wooden box using a dovetail joint.
Step 1: Choose Your Wood
Begin by selecting a wood type that is forgiving and easy to work with. Softwoods such as cedar or pine are good choices for beginners, as they are more malleable.
Step 2: Measure and Mark
Use a marking gauge to mark your dovetail layout on the wood’s edge. Dovetail joints require precise angles, so take time to measure accurately.
Step 3: Cut the Tails
Using a Dozuki saw, carefully cut the angled tails. Japanese saws are highly accurate but require steady hands and patience. Check the angles and trim where necessary.
Step 4: Cut the Pins
Once the tails are cut, place them against the other board to mark the pins. Cut along these lines with precision, removing any excess wood.
Step 5: Test Fit and Adjust
Before assembling, test fit the dovetails to ensure a snug connection. If the joints are too tight, use a chisel to shave small amounts of wood until it fits.
Step 6: Assemble and Sand
Once the joints fit correctly, gently tap the pieces together using a mallet. Sand the surface lightly to remove any rough edges.
Step 7: Finish
Apply an oil finish to highlight the natural grain of the wood. Let it dry before use.
6. Honing Your Skills in Japanese Joinery
Mastering Japanese joinery takes years of practice, but even beginners can develop their skills by gradually challenging themselves with increasingly complex joints and projects. Here are some practical tips:
- Start Small: Begin with simple joints and smaller projects, such as frames or small boxes, before progressing to furniture or larger items.
- Use Practice Pieces: Practice on scrap wood to avoid costly mistakes on final pieces.
- Sharpen Tools Regularly: Japanese tools are effective but need regular sharpening to maintain precision.
- Practice Patience: Precision is key; rushing can lead to mistakes that weaken the joint.
Conclusion
Japanese joinery offers a unique blend of artistry and practicality, and for beginners, it provides a pathway to mastering the essentials of woodworking. By starting with basic tools, understanding the fundamental joints, and applying them in small projects, you’ll develop the skills and appreciation for this ancient craft. Japanese joinery not only enhances woodworking ability but also fosters a deeper connection to the craft itself, inviting practitioners to embrace patience, precision, and respect for the natural beauty of wood.


