The Ultimate Guide to Mortise and Tenon Joints
Mortise and tenon joints are among the oldest and most reliable methods of joining wood. They have been used for thousands of years, from ancient Egyptian furniture to the timber-framed structures of medieval Europe, and they remain a favorite among woodworkers today. Their strength, versatility, and ease of use make them indispensable in fine woodworking.
Whether you’re building furniture, doors, or architectural components, mastering this joint will elevate your craftsmanship.
This guide will walk you through everything you need to know about mortise and tenon joints—from understanding their basic structure to executing them with precision.
What is a Mortise and Tenon Joint?
A mortise and tenon joint is a simple yet strong woodworking joint that connects two pieces of wood at right angles. The joint consists of two components:
- The mortise: A cavity, or hole, cut into one piece of wood.
- The tenon: A projection on the end of the other piece of wood that fits into the mortise.
This joint is typically used when one piece of wood (the tenon piece) meets another (the mortise piece) at a 90-degree angle. The tenon is inserted into the mortise and can be secured in a variety of ways, including with glue, wedges, pins, or even left loose depending on the intended use.

When properly made, this joint can withstand both tension and compression forces, making it incredibly durable and long-lasting.
Types of Mortise and Tenon Joints
There are several variations of mortise and tenon joints, each suited to different applications:
- Through mortise and tenon: The tenon passes completely through the mortise and is visible on the other side of the mortise piece. This type of joint is often used in furniture making, where both the strength and the appearance of the joint are important.
- Blind mortise and tenon: In this type, the tenon does not pass all the way through the mortise, remaining hidden inside the mortise piece. This is ideal when you don’t want the joint to be visible on the outside of the workpiece.
- Stub tenon: A short tenon used when the strength of a long tenon is not necessary. This is often used in lighter, smaller furniture pieces.
- Haunched mortise and tenon: A variation of the standard joint where a small haunch, or extension, is added to the tenon to increase the strength and resist twisting forces. This type is commonly used in door frames and large furniture pieces.
- Wedged mortise and tenon: This joint uses wedges driven into the tenon after it’s inserted into the mortise, which locks it tightly in place. This is often used for outdoor structures and furniture where maximum strength is needed.
Each type of mortise and tenon joint has its specific purpose. Choosing the correct one depends on the project’s requirements, such as strength, visibility, and the amount of stress the joint will face.
Materials and Tools Needed
To create a mortise and tenon joint, you’ll need a few basic tools and materials. While modern machinery can speed up the process, traditional hand tools also work well and provide great satisfaction.
- Materials:
- Wood pieces (one for the mortise and one for the tenon)
- Glue (if required for the joint)
- Tools:
- Chisels: For cutting the mortise. A set of sharp chisels ranging in sizes is essential for creating clean, accurate mortises.
- Mortise gauge: A marking tool to layout the mortise and tenon dimensions.
- Mallet: For driving chisels and other tools.
- Tenon saw: A fine-toothed saw for cutting the tenon.
- Drill or mortising machine: To remove bulk material from the mortise quickly (optional).
- Clamps: To hold your workpiece steady during cutting and assembly.
- Wood glue and wedges: Depending on the type of joint you are making.
Mastering both hand and power tools will allow you to create joints that fit snugly and perform well under various types of stresses.
How to Make a Mortise and Tenon Joint
Step 1: Plan and Measure
The first step in making a mortise and tenon joint is to plan the dimensions of the joint. Typically, the tenon should be about one-third the thickness of the material it is going into. For example, if you’re working with a 3/4-inch thick piece of wood, the tenon should be about 1/4 inch thick.
Use a mortise gauge to mark out the mortise on one piece of wood and the tenon on the other. Make sure your measurements are accurate and consistent, as even small errors can result in a loose or weak joint.
Step 2: Cut the Mortise
To cut the mortise, use a drill or mortising machine to remove the bulk of the waste material. If you’re using a hand tool, start by drilling a series of holes inside the mortise lines, making sure to stop short of the depth you need. Then, use a sharp chisel to clean up the walls and floor of the mortise, ensuring the sides are straight and the bottom is flat.
Work carefully, taking small amounts of material at a time, and periodically check your progress by dry-fitting the tenon into the mortise.
Step 3: Cut the Tenon
Cutting the tenon is usually done with a tenon saw or a table saw. Start by cutting the shoulders of the tenon—the flat surfaces that will rest against the edges of the mortise. Then cut the cheeks, which are the sides of the tenon that fit into the mortise. Be sure to cut slightly oversize, as you can always remove more material later if needed.
After cutting the tenon, use a chisel to clean up any rough edges and ensure the tenon fits snugly into the mortise.
Step 4: Dry Fit and Adjust
Before gluing or assembling the joint, dry-fit the pieces together to check the fit. The tenon should slide into the mortise with some resistance but without forcing. If it’s too tight, shave off small amounts of material from the tenon until it fits perfectly.
If the fit is loose, you may need to adjust the mortise walls or add wedges to tighten the joint.
Step 5: Assemble and Glue
Once the fit is perfect, you can assemble the joint. If you’re using glue, apply it to the inside of the mortise and the surfaces of the tenon, then insert the tenon into the mortise. Use clamps to hold the joint in place while the glue dries. For wedged mortise and tenon joints, drive wedges into the tenon to lock it securely in place.
Allow the glue to cure fully before applying any additional stress to the joint.
Common Mistakes and How to Avoid Them
While mortise and tenon joints are strong and reliable, they can be tricky to execute perfectly. Here are some common mistakes woodworkers make and how to avoid them:
- Poor Fit: A tenon that’s too loose or too tight will compromise the strength of the joint. Always dry-fit the joint and make small adjustments as necessary.
- Misaligned Shoulders: If the shoulders of the tenon aren’t perfectly square, the joint won’t sit flush. Take your time when marking and cutting the shoulders, and use a sharp chisel to make any final adjustments.
- Gluing Mistakes: Applying too much glue can result in squeeze-out, which is messy and weakens the joint by starving it of glue. Apply glue sparingly and evenly, and always clean up excess glue before it dries.
- Weak Mortise Walls: If the walls of the mortise are too thin, they may split under pressure. Make sure your mortise is properly sized for the piece of wood you’re working with.
Strengthening Mortise and Tenon Joints
While a standard mortise and tenon joint is strong on its own, there are ways to make it even stronger:
- Add Wedges: In through-tenon joints, wedges driven into the tenon after assembly will lock the joint in place and increase its strength.
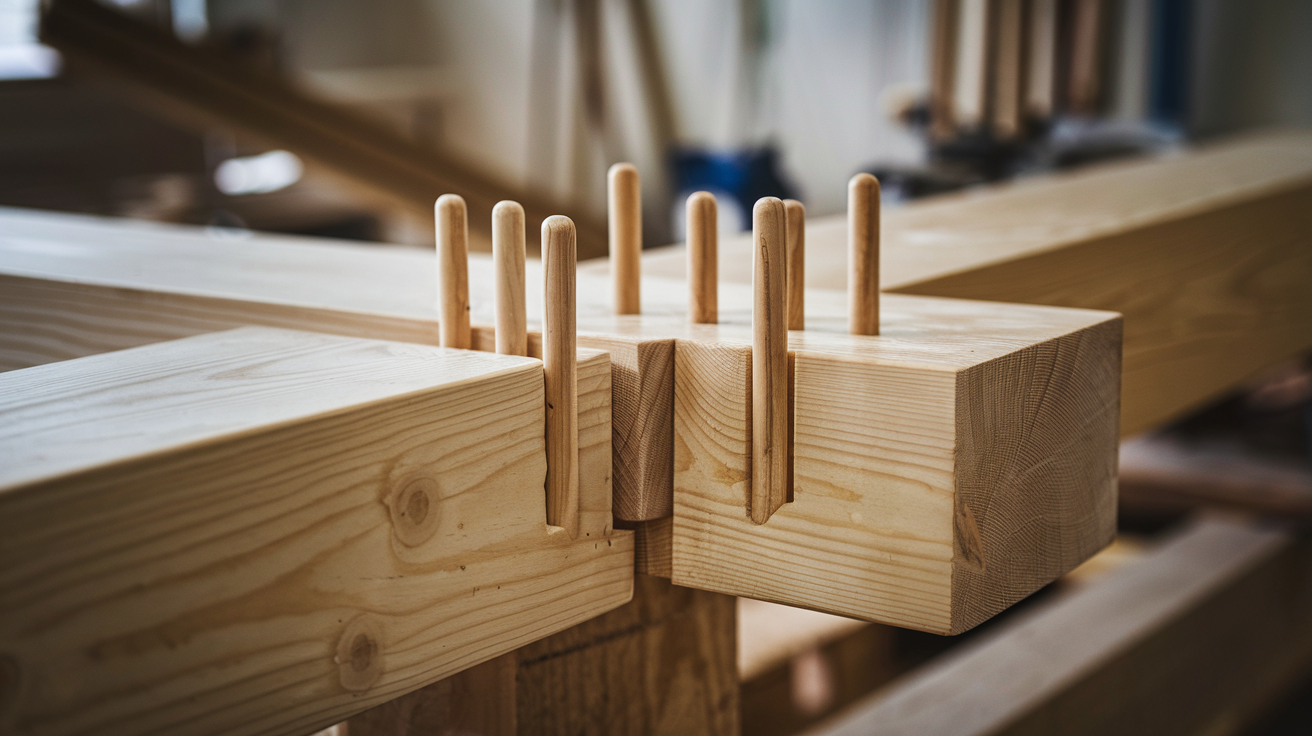
- Drawboring: In traditional woodworking, drawboring involves driving a wooden peg through an offset hole in the tenon and mortise, pulling the joint together tightly and providing extra mechanical strength.
- Pinned Joints: Metal or wooden dowels can be inserted through the joint to prevent the tenon from pulling out of the mortise.
When to Use Mortise and Tenon Joints
Mortise and tenon joints are incredibly versatile and can be used in a wide variety of projects. Some common applications include:
- Furniture: Chairs, tables, beds, and cabinets all benefit from the strength and durability of mortise and tenon joints.
- Doors and Windows: The frames of doors and windows often use mortise and tenon joints because they provide structural integrity while allowing for movement and expansion.
- Framing and Timber Construction: Mortise and tenon joints are widely used in traditional timber framing for their ability to handle heavy loads and resist racking forces.
Hand Tools vs. Power Tools for Mortise and Tenon Joints
Both hand tools and power tools can be used to create mortise and tenon joints, each with its own advantages.
- Hand Tools: Using chisels and hand saws allows for greater control and precision, especially on small or delicate projects. However, it can be time-consuming and requires more skill.
- Power Tools: Machines like mortisers and tenoning jigs can speed up the process, making it easier to create multiple joints quickly and accurately. Power tools are ideal for large projects or production work, but they may lack the fine control of hand tools.
The Importance of Practice
As with any woodworking technique, practice is key to mastering mortise and tenon joints. Start with simple joints and gradually work your way up to more complex variations. Keep in mind that precision is essential for a strong joint, so take your time and focus on accuracy.
Mortise and tenon joints are a foundational skill for any woodworker. Their strength, versatility, and timeless appeal make them one of the most valuable joints in the woodworking world. By understanding the different types of mortise and tenon joints, practicing your technique, and avoiding common mistakes, you can create joints that will stand the test of time in any project.


